← Back to Course
Digital Input: Buttons and Switches
🔘 Reading Buttons - Manual Control for Irrigation Systems
🔘 What You'll Learn:
- 🔌 Wire a button to ESP32/ESP8266 using internal pull-up
- 💻 Read button presses with debounce to avoid false triggers
- 💧 Manual pump control - override automated irrigation
- 🌱 Emergency stop button for irrigation systems
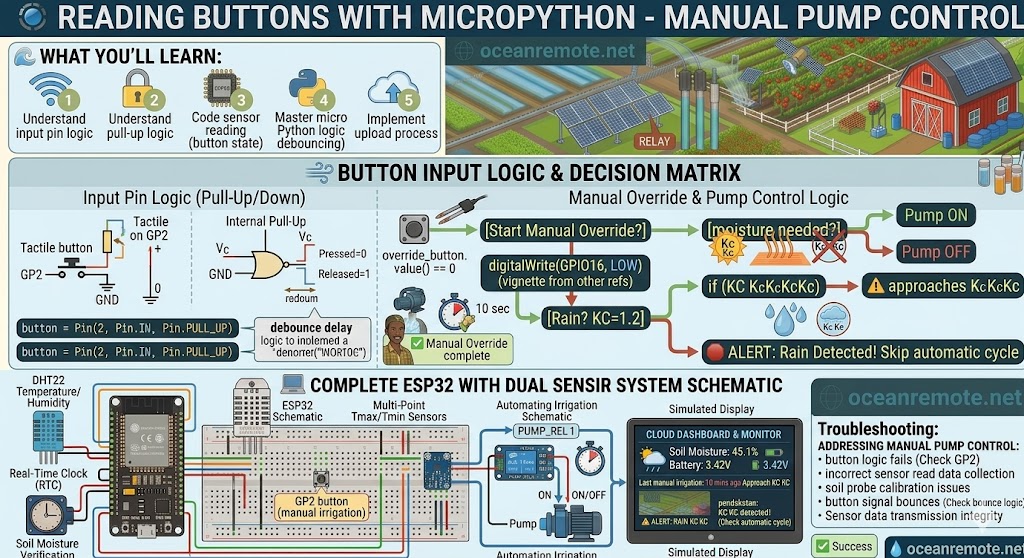
🔌 Button Wiring
Button Wiring (using internal pull-up):

    ESP32/ESP8266              Button
    ═══════════════            ══════
    GPIO2 ───────────────────── Button Pin 1
    GND   ───────────────────── Button Pin 2

    ⚠️ No external resistor needed - ESP32 has internal pull-up!

    Button pressed  → GPIO reads LOW (0V)
    Button released → GPIO reads HIGH (3.3V)
📖 Simple Button Reader (with Debounce)
#include <Arduino.h>

#define BUTTON_PIN 2
#define LED_PIN 4

bool ledState = false;
unsigned long lastDebounce = 0;
const int DEBOUNCE_DELAY = 200;

void setup() {
    Serial.begin(115200);
    pinMode(BUTTON_PIN, INPUT_PULLUP);
    pinMode(LED_PIN, OUTPUT);
    digitalWrite(LED_PIN, LOW);
}

void loop() {
    if (digitalRead(BUTTON_PIN) == LOW) {
        if (millis() - lastDebounce > DEBOUNCE_DELAY) {
            ledState = !ledState;
            digitalWrite(LED_PIN, ledState ? HIGH : LOW);
            Serial.println("Button pressed! LED toggled");
            lastDebounce = millis();
        }
    }
}
💧 Farm Application: Manual Pump Override
#include <Arduino.h>

#define OVERRIDE_BUTTON 2
#define PUMP_RELAY 5
#define SOIL_PIN 32

const int DRY = 3800, WET = 1500;
const int AUTO_THRESHOLD = 30;

bool autoMode = true;
unsigned long lastPress = 0;
unsigned long pumpStart = 0;
bool pumpRunning = false;

void setup() {
    Serial.begin(115200);
    pinMode(OVERRIDE_BUTTON, INPUT_PULLUP);
    pinMode(PUMP_RELAY, OUTPUT);
    digitalWrite(PUMP_RELAY, HIGH);  // Pump OFF

    pinMode(SOIL_PIN, INPUT);
    Serial.println("💧 Irrigation Controller - Press button for manual water");
}

void waterPump(int seconds) {
    Serial.printf("💧 Pump ON for %d seconds\n", seconds);
    digitalWrite(PUMP_RELAY, LOW);   // Pump ON
    pumpRunning = true;
    pumpStart = millis();

    while (millis() - pumpStart < seconds * 1000) {
        // Check emergency stop button during watering
        if (digitalRead(OVERRIDE_BUTTON) == LOW) {
            Serial.println("🛑 Emergency stop!");
            break;
        }
        delay(50);
    }

    digitalWrite(PUMP_RELAY, HIGH);  // Pump OFF
    pumpRunning = false;
    Serial.println("✅ Pump OFF");
}

int readSoilMoisture() {
    int raw = analogRead(SOIL_PIN);
    int moisture = map(raw, DRY, WET, 0, 100);
    return constrain(moisture, 0, 100);
}

void loop() {
    int moisture = readSoilMoisture();

    // Check manual override button
    if (digitalRead(OVERRIDE_BUTTON) == LOW) {
        if (millis() - lastPress > 500) {  // Debounce
            Serial.println("🔘 Manual override triggered!");
            waterPump(15);  // Water for 15 seconds
            lastPress = millis();
        }
    }

    // Auto mode
    if (moisture < AUTO_THRESHOLD && !pumpRunning) {
        Serial.printf("Soil dry (%d%%) - Auto watering\n", moisture);
        waterPump(10);
    }

    delay(1000);
}
💡 Debounce Explained:
- Mechanical buttons "bounce" for 5-20ms after press
- Without debounce, one press looks like 10-100 presses
- Solution: Ignore button changes for 200ms after first detection
millis() - lastPress > DEBOUNCE_DELAYensures one press = one action
📖 Farm Application:
A farmer installed a manual override button next to their automated irrigation controller. When a dry spot was noticed, pressing the button watered that zone for 15 seconds without changing the automated schedule.
🎯 Key Takeaways:
- ✅ Use
pinMode(pin, INPUT_PULLUP)for internal resistor - ✅ Button pressed = LOW (0V), released = HIGH (3.3V)
- ✅ Always debounce to prevent false triggers
- ✅ Manual override lets operators intervene when needed
💡 Key Takeaways:
- Apply these concepts directly to your farm or project.
- Take notes on important details for the quiz.
- Use the button below to track your progress.
×
![Enlarged view]()