← Back to Course
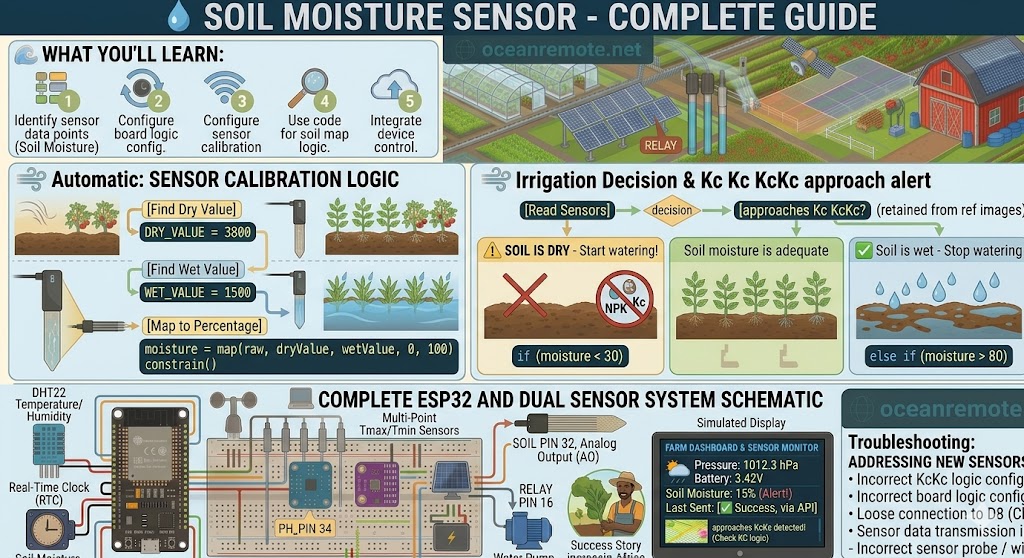
Soil Moisture Sensor - Wiring and Calibration
💧 Soil Moisture Sensor - Complete Guide for Smart Irrigation
💧 What You'll Learn:
- 🔌 Wire capacitive and resistive soil moisture sensors to ESP32
- 📊 Calibrate your sensor (DRY_VALUE and WET_VALUE)
- 💧 Make automated irrigation decisions (water when dry)
- 💰 Save 30-40% of water while improving crop yields
Soil moisture sensors are the most important sensors for smart irrigation. They can save 30-40% of water while improving crop yields. A $10 sensor can save thousands of liters of water annually.
🔌 Wiring Instructions
Capacitive Soil Moisture Sensor     ESP32
═══════════════════════════════     ════
VCC (3.3-5V)               ─────►   3.3V
GND                        ─────►   GND
AO (Analog Output)         ─────►   GPIO32

⚠️ Resistive sensors use same wiring but corrode faster (months vs years)
💡 Capacitive vs Resistive:
- Capacitive ($8-12): Lasts years, no corrosion, more accurate ✅ BEST
- Resistive ($2-3): Corrodes in 3-6 months, less accurate ❌ AVOID for farming
📊 Calibration Process (CRITICAL!)
// Step 1: Find DRY_VALUE
// Place sensor in dry air for 1 minute
// Record the reading (typically 3500-4095 on ESP32)

// Step 2: Find WET_VALUE
// Submerge sensor completely in water for 1 minute
// Record the reading (typically 1000-2000)

// Step 3: Update code with YOUR values
const int DRY_VALUE = 3800;   // ← YOUR dry reading
const int WET_VALUE = 1500;   // ← YOUR wet reading

// Step 4: Calculate percentage
int raw = analogRead(SOIL_PIN);
int moisture = map(raw, DRY_VALUE, WET_VALUE, 0, 100);
moisture = constrain(moisture, 0, 100);
📖 Complete Working Code
#define SOIL_PIN 32

// CALIBRATE THESE VALUES FOR YOUR SENSOR!
const int DRY_VALUE = 3800;   // Reading in dry air
const int WET_VALUE = 1500;   // Reading in water

void setup() {
    Serial.begin(115200);
    pinMode(SOIL_PIN, INPUT);
    Serial.println("💧 Soil Moisture Monitor Started");
}

void loop() {
    int raw = analogRead(SOIL_PIN);
    int moisture = map(raw, DRY_VALUE, WET_VALUE, 0, 100);
    moisture = constrain(moisture, 0, 100);

    Serial.println("━━━━━━━━━━━━━━━━━━━━━━━━━━━━━━━━━━");
    Serial.printf("📊 Raw ADC: %d\n", raw);
    Serial.printf("💧 Soil Moisture: %d%%\n", moisture);

    // Irrigation decision
    if (moisture < 30) {
        Serial.println("⚠️ SOIL IS DRY - Start watering!");
        // digitalWrite(RELAY_PIN, LOW);  // Turn pump ON
    } else if (moisture > 80) {
        Serial.println("✅ Soil is wet - Stop watering");
        // digitalWrite(RELAY_PIN, HIGH); // Turn pump OFF
    } else if (moisture < 50) {
        Serial.println("💡 Soil is drying - Monitor closely");
    } else {
        Serial.println("✅ Soil moisture adequate");
    }
    Serial.println("━━━━━━━━━━━━━━━━━━━━━━━━━━━━━━━━━━\n");

    delay(60000);  // Read every minute
}
📖 Success Story - Kenyan Tomato Farm:
A tomato farmer installed capacitive soil moisture sensors on 2 hectares:
- 💧 Before: Watered daily at 6 AM regardless of soil condition
- 💧 After: Only watered when moisture dropped below 35%
- 📊 Result: 38% less water used, 28% higher tomato yield
- 💰 Savings: $45/month on water bills + higher quality fruit
⚠️ Common Mistakes:
- ❌ Not calibrating: Every sensor is different! Always calibrate yours.
- ❌ Using resistive sensors: They corrode in months. Buy capacitive sensors.
- ❌ Reading too often: Every minute is fine. Every second will overload your sensor.
- ❌ Wrong depth: Insert sensor at root depth (10-20cm), not surface.
🎯 Key Takeaways:
- ✅ Capacitive sensors last YEARS (resistive fails in months)
- ✅ Calibration is MANDATORY for accurate readings
- ✅ Water when moisture < 30%, stop when > 80%
- ✅ Read every 15-60 minutes (not constantly)
- ✅ A $10 sensor can save thousands of liters of water annually
💡 Key Takeaways:
- Apply these concepts directly to your farm or project.
- Take notes on important details for the quiz.
- Use the button below to track your progress.
×
![Enlarged view]()