Complete Weather Station
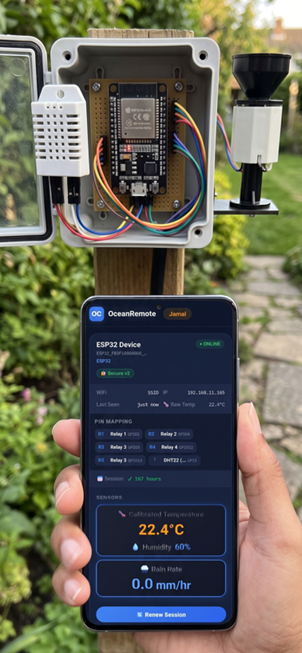
⛅ Complete Weather Station - Monitor Temperature & Humidity
🌡️ What You'll Learn in This Lesson:
- Build a solar-powered weather station for your farm
- Measure temperature and humidity with DHT22 sensor
- Send real-time weather data to OceanRemote cloud
- Optimize battery life with deep sleep (5-minute intervals)
- Monitor crop conditions remotely from anywhere
📋 Why Weather Monitoring Matters for Your Farm
Weather conditions directly affect crop health, disease risk, and irrigation needs. With this weather station, you can:
| Weather Parameter | Why It Matters | Actionable Insight |
|---|---|---|
| 🌡️ Temperature | Affects germination, growth, and flowering | Protect crops when temperature exceeds 35°C or drops below 5°C |
| 💧 Humidity | High humidity promotes fungal diseases | Increase ventilation when humidity > 80% |
| 🌧️ Rainfall (add later) | Helps optimize irrigation scheduling | Skip irrigation when rain is detected |
🛠️ Components You'll Need
| Component | Approximate Cost | Purpose |
|---|---|---|
| ESP32 | $5-10 | Brain of the weather station |
| DHT22 Sensor | $5-7 | Measures temperature and humidity |
| 10kΩ Resistor | $0.10 | Pull-up for DHT22 data line |
| 6V Solar Panel (optional) | $10-15 | For off-grid operation |
🔌 Wiring Diagram
DHT22 Sensor → ESP32
┌─────────────────────────────────┐
│ Pin 1 (VCC)  → 3.3V             │
│ Pin 2 (DATA) → GPIO16           │
│ Pin 3 (NC)   → Not connected    │
│ Pin 4 (GND)  → GND              │
└─────────────────────────────────┘

Add a 10kΩ resistor between DATA and VCC!
📖 Complete Code with Line-by-Line Explanation
/* * Complete Weather Station for ESP32 * Monitors temperature and humidity using DHT22 * Sends data to OceanRemote cloud every 5 minutes * Perfect for monitoring greenhouse or field conditions * * Components Required: * - ESP32 board * - DHT22 temperature/humidity sensor * - 10kΩ resistor * - (Optional) Solar panel + battery for off-grid */ #include// For internet connectivity #include // For sending data to cloud #include // DHT sensor library // ========== DHT22 CONFIGURATION ========== #define DHTPIN 16 // GPIO16 - Data pin for DHT22 #define DHTTYPE DHT22 // Using DHT22 sensor (more accurate than DHT11) // ========== WIFI CONFIGURATION ========== const char* ssid = "YOUR_WIFI"; // Replace with your WiFi name const char* password = "YOUR_PASSWORD"; // Replace with your WiFi password // ========== OCEANREMOTE CONFIGURATION ========== const char* token = "YOUR_TOKEN"; // Replace with your OceanRemote device token // Create DHT object DHT dht(DHTPIN, DHTTYPE); void setup() { // ---------- STEP 1: INITIALIZE SENSORS ---------- Serial.begin(115200); dht.begin(); // Start the DHT22 sensor // ---------- STEP 2: CONNECT TO WIFI ---------- WiFi.begin(ssid, password); while (WiFi.status() != WL_CONNECTED) { delay(500); Serial.print("."); } Serial.println("\n✅ WiFi connected!"); // ---------- STEP 3: READ SENSOR DATA ---------- float temp = dht.readTemperature(); // Read temperature in Celsius float hum = dht.readHumidity(); // Read humidity percentage // Check if readings are valid (not NaN - Not a Number) if (!isnan(temp) && !isnan(hum)) { Serial.print("🌡️ Temperature: "); Serial.print(temp); Serial.println("°C"); Serial.print("💧 Humidity: "); Serial.print(hum); Serial.println("%"); // ---------- STEP 4: SEND DATA TO OCEANREMOTE ---------- HTTPClient http; http.begin("https://api.oceanremote.net/device/state"); http.addHeader("Content-Type", "application/x-www-form-urlencoded"); // Build the data string String data = "token=" + String(token); data += "&temperature=" + String(temp); data += "&humidity=" + String(hum); // Send POST request int httpCode = http.POST(data); if (httpCode > 0) { Serial.println("✅ Data sent to OceanRemote!"); } else { Serial.println("❌ Failed to send data"); } http.end(); // Close connection } else { Serial.println("❌ Failed to read from DHT22 sensor!"); } // ---------- STEP 5: DEEP SLEEP (5 MINUTES) ---------- // Sleep for 5 minutes to save power // Formula: minutes * 60 * 1,000,000 microseconds esp_sleep_enable_timer_wakeup(5 * 60 * 1000000ULL); Serial.println("💤 Going to sleep for 5 minutes..."); esp_deep_sleep_start(); // ESP32 goes to sleep here } void loop() { // This function never runs due to deep sleep // The ESP32 wakes up, runs setup(), then sleeps again }
📊 Code Breakdown: Understanding Each Part
📡 1. DHT22 Library and Initialization
#include#define DHTPIN 16 #define DHTTYPE DHT22 DHT dht(DHTPIN, DHTTYPE);
#include <DHT.h>- Includes the DHT sensor library (install via Arduino Library Manager)#define DHTPIN 16- Sets the GPIO pin connected to DHT22 data#define DHTTYPE DHT22- Tells the library we're using DHT22 (more accurate)DHT dht(DHTPIN, DHTTYPE);- Creates a DHT object for reading datadht.begin();- Initializes the sensor insetup()
📡 2. Reading Temperature and Humidity
float temp = dht.readTemperature();  // Returns Celsius
float hum = dht.readHumidity();       // Returns percentage (0-100%)
dht.readTemperature()- Returns temperature in Celsius (addtruefor Fahrenheit:.readTemperature(true))dht.readHumidity()- Returns relative humidity percentage- ⚠️ Important: These functions return
NaN(Not a Number) if reading fails. Always check with!isnan()
📡 3. Sending Data to OceanRemote
HTTPClient http;
http.begin("https://api.oceanremote.net/device/state");
http.addHeader("Content-Type", "application/x-www-form-urlencoded");

String data = "token=" + String(token);
data += "&temperature=" + String(temp);
data += "&humidity=" + String(hum);

int httpCode = http.POST(data);
HTTPClient http;- Creates an HTTP client objecthttp.begin(URL)- Specifies the OceanRemote API endpointhttp.addHeader()- Tells the server we're sending form datahttp.POST(data)- Sends the data and returns HTTP status code (200 = success)
🔋 4. Deep Sleep for Battery Life
esp_sleep_enable_timer_wakeup(5 * 60 * 1000000ULL);
esp_deep_sleep_start();
esp_sleep_enable_timer_wakeup()- Sets a timer to wake the ESP32- Formula:
minutes × 60 × 1,000,000(microseconds) esp_deep_sleep_start()- Immediately puts ESP32 into deep sleep- Power consumption: 2.5μA (microamps) during sleep!
🎯 Customizing Your Weather Station
Change Reading Interval
// Every 5 minutes (current)
esp_sleep_enable_timer_wakeup(5 * 60 * 1000000ULL);

// Every 1 minute (more frequent)
esp_sleep_enable_timer_wakeup(1 * 60 * 1000000ULL);

// Every 15 minutes (battery saving)
esp_sleep_enable_timer_wakeup(15 * 60 * 1000000ULL);
Use Fahrenheit Instead of Celsius
float temp = dht.readTemperature(true); // true = Fahrenheit
Add Temperature Alerts
if (temp > 35) {
    Serial.println("⚠️ HIGH TEMPERATURE! Open greenhouse vents!");
} else if (temp < 5) {
    Serial.println("⚠️ LOW TEMPERATURE! Risk of frost!");
}

if (hum > 80) {
    Serial.println("⚠️ HIGH HUMIDITY! Risk of fungal disease!");
}
📈 DHT22 vs DHT11 Comparison
| Feature | DHT22 | DHT11 |
|---|---|---|
| Temperature Range | -40°C to +80°C | 0°C to +50°C |
| Temperature Accuracy | ±0.5°C | ±2°C |
| Humidity Range | 0-100% | 20-90% |
| Humidity Accuracy | ±2% | ±5% |
Use DHT22 for agriculture. The extra cost ($2-3 more) is worth it for accurate readings that help you make better farming decisions!
A tomato farmer installed this weather station in a 500m² greenhouse. Results:
- 🌡️ Detected temperature spikes >40°C → opened vents, saved crop
- 💧 Humidity alerts prevented fungal disease (reduced losses by 35%)
- 📊 Historical data helped optimize planting times for next season
"The weather station paid for itself in one season by preventing disease!" - Greenhouse Manager, Morocco
- ❌ "Failed to read from DHT22": Check wiring (add 10kΩ pull-up resistor between DATA and VCC)
- ❌ NaN readings: DHT22 needs 2 seconds between readings. Add
delay(2000)afterdht.begin() - ❌ WiFi not connecting: Verify SSID/password and signal strength (ESP32 needs 2.4GHz WiFi)
- ❌ Data not appearing in OceanRemote: Verify token is correct and device is activated
- ❌ ESP32 not waking from sleep: Connect GPIO16 to RST pin for deep sleep wake-up
🔋 Battery Life Calculation
With a 2000mAh battery and 5-minute wake intervals:
- Wake time: 3 seconds @ 150mA = 0.125mAh per cycle
- Sleep time: 5 minutes @ 0.0025mA = 0.00021mAh per cycle
- Total per cycle: ~0.125mAh
- Cycles per day: 288
- Daily consumption: 36mAh
- 2000mAh battery lasts: 2000 ÷ 36 = 55 DAYS
Add a 6V 2W solar panel with a TP4056 charging module for unlimited battery life! The system will run indefinitely.
🚀 Next Steps: Enhance Your Weather Station
- Add a rain sensor: Detect rainfall and adjust irrigation schedules
- Add a barometric pressure sensor (BMP280): Predict weather changes
- Add an anemometer: Measure wind speed for spray timing
- Add a light sensor (LDR): Track sunlight for photosynthesis monitoring
- Connect to a display (OLED): Show real-time readings locally
You've built a complete, solar-ready weather station! Your farm can now monitor temperature and humidity remotely, helping you make better decisions about planting, harvesting, and disease prevention.
📊 Check your data dashboard at OceanRemote to see temperature and humidity trends over time!
- Apply these concepts directly to your farm or project.
- Take notes on important details for the quiz.
- Use the button below to track your progress.