Button Input with Debouncing
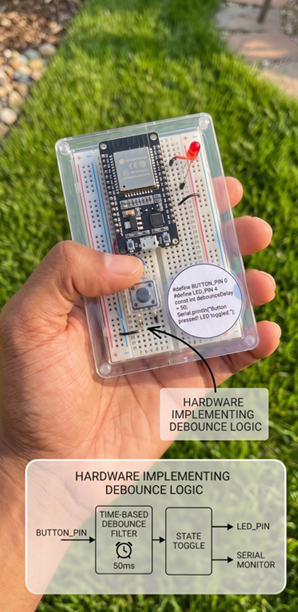
🔘 Button Input with Debouncing - Complete Guide
🔌 What You'll Learn in This Lesson:
- Read button presses reliably without false triggers
- Understand the "bouncing" problem and why it happens
- Implement professional debouncing algorithms
- Control LEDs, relays, or any output with buttons
- Create manual overrides for automated systems
🔧 What is Button Bouncing?
When you press a mechanical button, the contacts don't make perfect contact immediately. They "bounce" open/closed multiple times within milliseconds, creating multiple false readings.
| Without Debouncing | With Debouncing |
|---|---|
|
⏱️ Time: 0ms ─── Button pressed 📊 Reads: 1,0,1,0,1,0,1 (multiple false readings) 🚫 Result: LED toggles 7 times instead of once! |
⏱️ Time: 0ms ─── Button pressed 📊 Reads: 1,0,1,0,1 (ignores first 50ms) ✅ Result: LED toggles exactly once! |
A button press can generate 10-100 false readings within 10-50 milliseconds. Without debouncing, your code will detect multiple presses for one physical press!
📖 Complete Button with Debouncing Explained
/* * Button Input with Debouncing - Complete Guide * Toggles an LED when button is pressed * * Circuit: * Button: GPIO0 ──┬── Button ──► GND * └── 10kΩ resistor ──► 3.3V (using INPUT_PULLUP eliminates external resistor) * * LED: GPIO4 ──► 220Ω resistor ──► LED anode ──► LED cathode ──► GND * * Author: OceanRemote Education */ #include// ========== PIN DEFINITIONS ========== #define BUTTON_PIN 0 // GPIO0 (built-in button on many boards) #define LED_PIN 4 // GPIO4 - LED output // ========== DEBOUNCING VARIABLES ========== bool lastButtonState = HIGH; // Previous button state (HIGH = not pressed, LOW = pressed) unsigned long lastDebounceTime = 0; // Last time button state changed const unsigned long debounceDelay = 50; // Wait 50ms to confirm press (milliseconds) // ========== APPLICATION VARIABLES ========== bool ledState = false; // Current LED state (off initially) void setup() { // Initialize serial communication Serial.begin(115200); delay(100); // Configure button pin with internal pull-up resistor // When button is NOT pressed, pin reads HIGH (3.3V) // When button IS pressed, pin reads LOW (0V) pinMode(BUTTON_PIN, INPUT_PULLUP); // Configure LED pin as output pinMode(LED_PIN, OUTPUT); // Start with LED off digitalWrite(LED_PIN, LOW); Serial.println("========================================"); Serial.println("🔘 Button Debouncing Demo"); Serial.println(" Press the button to toggle LED"); Serial.println(" Hold button for irrigation manual override"); Serial.println("========================================"); } void loop() { // ---------- STEP 1: READ CURRENT BUTTON STATE ---------- bool currentReading = digitalRead(BUTTON_PIN); // ---------- STEP 2: DETECT STATE CHANGE ---------- // If reading changed from last time... if (currentReading != lastButtonState) { // Reset the debouncing timer lastDebounceTime = millis(); } // ---------- STEP 3: WAIT FOR DEBOUNCE PERIOD ---------- // If enough time has passed and the reading is still the same... if ((millis() - lastDebounceTime) > debounceDelay) { // ---------- STEP 4: BUTTON PRESS DETECTED ---------- // Button is pressed when reading is LOW (because we use INPUT_PULLUP) if (currentReading == LOW) { // Toggle LED state ledState = !ledState; digitalWrite(LED_PIN, ledState); // Print status message if (ledState) { Serial.println("✅ LED TURNED ON - Button pressed!"); // Could add action here: waterPump(10); // Manual irrigation override } else { Serial.println("❌ LED TURNED OFF - Button pressed!"); } // Add a small delay to prevent multiple toggles during single press // (Extra safety beyond debouncing) delay(100); } } // ---------- STEP 5: SAVE CURRENT STATE FOR NEXT LOOP ---------- lastButtonState = currentReading; // Small delay to prevent overwhelming the serial monitor delay(10); }
When using pinMode(pin, INPUT_PULLUP):
- Button NOT pressed → pin reads HIGH (1)
- Button IS pressed → pin reads LOW (0)
- No external resistor needed! Built-in pull-up resistor keeps pin HIGH until button grounds it.
⚙️ Advanced: Multiple Buttons with Debouncing
Perfect for control panels with multiple buttons:
/*
 * Multiple Buttons with Debouncing
 * Control different outputs with different buttons
 */

#define BUTTON1_PIN 0
#define BUTTON2_PIN 2
#define BUTTON3_PIN 4
#define RELAY1_PIN 5
#define RELAY2_PIN 16
#define RELAY3_PIN 17

// Button state structure
struct Button {
    int pin;
    bool lastState;
    unsigned long lastDebounce;
    bool outputState;
    int outputPin;
};

// Create button objects
Button buttons[] = {
    {BUTTON1_PIN, HIGH, 0, false, RELAY1_PIN},
    {BUTTON2_PIN, HIGH, 0, false, RELAY2_PIN},
    {BUTTON3_PIN, HIGH, 0, false, RELAY3_PIN}
};

const int debounceDelay = 50;
const int buttonCount = 3;

void setup() {
    Serial.begin(115200);

    for (int i = 0; i < buttonCount; i++) {
        pinMode(buttons[i].pin, INPUT_PULLUP);
        pinMode(buttons[i].outputPin, OUTPUT);
        digitalWrite(buttons[i].outputPin, LOW);
    }

    Serial.println("✅ Multiple button controller ready");
}

void loop() {
    for (int i = 0; i < buttonCount; i++) {
        Button *btn = &buttons[i];

        bool reading = digitalRead(btn->pin);

        if (reading != btn->lastState) {
            btn->lastDebounce = millis();
        }

        if ((millis() - btn->lastDebounce) > debounceDelay) {
            if (reading == LOW) {  // Button pressed
                btn->outputState = !btn->outputState;
                digitalWrite(btn->outputPin, btn->outputState);

                Serial.printf("Button %d toggled output to %s\n",
                             i + 1,
                             btn->outputState ? "ON" : "OFF");
                delay(100);
            }
        }

        btn->lastState = reading;
    }
}
🌱 Farm Application: Manual Irrigation Override
Allow farmers to manually water even when soil is moist:
/*
 * Manual Irrigation Override Button
 * Allows farmer to water crops manually even when soil is moist
 * Perfect for spot watering or emergency irrigation
 */

#define OVERRIDE_BUTTON 0
#define RELAY_PIN 4
#define SOIL_SENSOR_PIN 32

bool lastButtonState = HIGH;
unsigned long lastDebounce = 0;
const int debounceDelay = 50;
bool manualOverride = false;
unsigned long overrideStartTime = 0;
const int overrideDuration = 30000;  // Water for 30 seconds

void setup() {
    Serial.begin(115200);
    pinMode(OVERRIDE_BUTTON, INPUT_PULLUP);
    pinMode(RELAY_PIN, OUTPUT);
    digitalWrite(RELAY_PIN, HIGH);  // Pump OFF (active LOW relay)

    Serial.println("💧 Manual Irrigation Override Ready");
    Serial.println("   Press button to water for 30 seconds");
}

void checkSoilAndAutoWater() {
    int soilRaw = analogRead(SOIL_SENSOR_PIN);
    int moisture = map(soilRaw, 3800, 1500, 0, 100);
    moisture = constrain(moisture, 0, 100);

    // Auto water if soil is dry AND no manual override active
    if (moisture < 30 && !manualOverride) {
        Serial.println("💧 AUTO: Soil dry - Starting irrigation");
        digitalWrite(RELAY_PIN, LOW);   // Pump ON
        delay(10000);                    // Water for 10 seconds
        digitalWrite(RELAY_PIN, HIGH);  // Pump OFF
        Serial.println("💧 AUTO: Irrigation complete");
    }
}

void checkManualOverride() {
    bool reading = digitalRead(OVERRIDE_BUTTON);

    if (reading != lastButtonState) {
        lastDebounce = millis();
    }

    if ((millis() - lastDebounce) > debounceDelay) {
        if (reading == LOW && !manualOverride) {
            // Manual button pressed - start override
            manualOverride = true;
            overrideStartTime = millis();
            digitalWrite(RELAY_PIN, LOW);   // Pump ON
            Serial.println("🔘 MANUAL: Button pressed - Starting irrigation");
        }
    }
    lastButtonState = reading;

    // Stop manual override after duration
    if (manualOverride && (millis() - overrideStartTime) >= overrideDuration) {
        digitalWrite(RELAY_PIN, HIGH);  // Pump OFF
        manualOverride = false;
        Serial.println("🔘 MANUAL: Irrigation complete - Returning to auto mode");
    }
}

void loop() {
    checkManualOverride();      // Check button first (priority)
    checkSoilAndAutoWater();     // Then auto water if needed
    delay(100);
}
A farmer installed manual override buttons on automated irrigation zones:
- 🔘 Problem: Automated sensors sometimes malfunctioned
- 💡 Solution: Added manual override buttons for each zone
- 💧 Result: Farmer can water specific areas on-demand
- 📈 Impact: 30% water savings + crop protection during sensor failures
"The manual override saved my crops when a sensor failed during a dry spell!" - Farmer, Nigeria
📊 Alternative: Using the Bounce2 Library (Simpler)
For beginners who want a ready-made solution:
/* * Using Bounce2 Library for Easy Debouncing * Install via: Arduino Library Manager → Search "Bounce2" */ #include#define BUTTON_PIN 0 #define LED_PIN 4 // Create button object Bounce debouncer = Bounce(); void setup() { Serial.begin(115200); pinMode(BUTTON_PIN, INPUT_PULLUP); pinMode(LED_PIN, OUTPUT); // Setup debouncer debouncer.attach(BUTTON_PIN); debouncer.interval(50); // Debounce time in milliseconds } void loop() { debouncer.update(); // Update debouncer if (debouncer.fell()) { // Button was pressed (HIGH → LOW) static bool ledState = false; ledState = !ledState; digitalWrite(LED_PIN, ledState); Serial.println("Button pressed! LED toggled."); } }
📊 Button States Reference
| Method | Description | Use Case |
|---|---|---|
digitalRead(pin) |
Read current button state | Simple press detection |
debouncer.fell() |
Detects HIGH → LOW transition | Single press detection |
debouncer.rose() |
Detects LOW → HIGH transition | Release detection |
| Milliseconds count | Track how long button has been pressed | Long-press actions |
You've mastered button input with debouncing!
✅ Understanding the bouncing problem
✅ Professional debouncing algorithm
✅ Multiple button support
✅ Manual irrigation override system
✅ Alternative library approach
Your buttons will now work reliably every time!
- 💧 Manual Irrigation Override: Turn on water pump regardless of sensors
- 🚪 Gate/Valve Control: Open/close water valves manually
- 🔧 System Reset: Reset ESP32 or calibration values
- 📱 Manual Data Trigger: Force sensor reading and transmission
- 🔒 Safety Cut-off: Emergency stop for pumps or machinery
- Apply these concepts directly to your farm or project.
- Take notes on important details for the quiz.
- Use the button below to track your progress.