PWM LED Dimming and Motor Speed Control
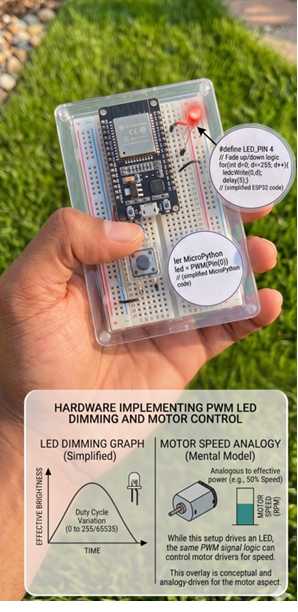
🎛️ PWM - LED Dimming and Motor Speed Control
⚡ What You'll Learn in This Lesson:
- Understand Pulse Width Modulation (PWM) and how it creates "analog" output
- Dim LEDs smoothly for greenhouse lighting control
- Control water pump speed for variable irrigation
- Adjust fan speed for ventilation systems
- Master ESP32 PWM with LEDC (16 channels!)
📊 What is PWM (Pulse Width Modulation)?
PWM rapidly turns a digital pin ON and OFF to create an average voltage between 0V and 3.3V. The percentage of time the signal is HIGH is called the duty cycle.
| Duty Cycle | ON Time | OFF Time | Average Voltage | LED Brightness |
|---|---|---|---|---|
| 0% | Always OFF | Always OFF | 0V | Off |
| 25% | 25% of time | 75% of time | 0.825V | Dim |
| 50% | 50% of time | 50% of time | 1.65V | Medium |
| 75% | 75% of time | 25% of time | 2.475V | Bright |
| 100% | Always ON | Always OFF | 3.3V | Full brightness |
Our eyes can't see the rapid blinking (thousands of times per second). Instead, we perceive the average brightness. For motors, the average voltage determines speed.
📖 ESP32 PWM Complete Guide (LEDC)
/* * ESP32 PWM - Complete Guide * Dims an LED smoothly up and down * * ESP32 has 16 independent PWM channels! * * Circuit: * LED anode (long leg) → 220Ω resistor → GPIO4 * LED cathode (short leg) → GND * * Author: OceanRemote Education */ #include// ========== PWM CONFIGURATION ========== const int ledPin = 4; // GPIO pin for LED const int pwmChannel = 0; // PWM channel (0-15) const int pwmFreq = 5000; // Frequency in Hz (5000 = 5kHz) const int pwmResolution = 8; // Resolution in bits (8-bit = 0-255) // PWM value range: 0 (0% duty) to 255 (100% duty) int brightness = 0; int fadeAmount = 5; void setup() { Serial.begin(115200); // Step 1: Configure PWM channel ledcSetup(pwmChannel, pwmFreq, pwmResolution); // Step 2: Attach channel to GPIO pin ledcAttachPin(ledPin, pwmChannel); Serial.println("========================================"); Serial.println("🎛️ ESP32 PWM LED Dimmer"); Serial.println(" LED will fade up and down smoothly"); Serial.println("========================================"); } void loop() { // Method 1: Smooth fading (ramp up and down) ledcWrite(pwmChannel, brightness); brightness += fadeAmount; if (brightness <= 0 || brightness >= 255) { fadeAmount = -fadeAmount; Serial.printf("Direction changed. Brightness: %d\n", brightness); } delay(10); // Small delay controls fade speed }
🌱 Agricultural Application 1: Variable Speed Water Pump
Control pump speed based on soil moisture - slower for seedlings, faster for mature plants!
/* * Variable Speed Water Pump Control * Pump speed adjusts based on soil moisture level * * Circuit: * - Soil moisture sensor → GPIO32 (ADC) * - MOSFET gate → GPIO4 (PWM) * - MOSFET drain → Water pump (-) * - MOSFET source → GND * - Water pump (+) → 12V power supply */ #include// ========== PIN DEFINITIONS ========== #define SOIL_SENSOR_PIN 32 #define PUMP_PWM_PIN 4 #define PUMP_PWM_CHANNEL 0 // ========== SOIL MOISTURE CALIBRATION ========== const int SOIL_DRY = 3800; // Value in dry air const int SOIL_WET = 1500; // Value in water const int SOIL_TARGET = 60; // Target moisture percentage // ========== PWM CONFIGURATION ========== const int PWM_FREQ = 1000; // 1kHz for motors (lower is better) const int PWM_RESOLUTION = 8; // 8-bit (0-255) void setup() { Serial.begin(115200); // Configure PWM for pump control ledcSetup(PUMP_PWM_CHANNEL, PWM_FREQ, PWM_RESOLUTION); ledcAttachPin(PUMP_PWM_PIN, PUMP_PWM_CHANNEL); // Start pump off ledcWrite(PUMP_PWM_CHANNEL, 0); Serial.println("💧 Variable Speed Irrigation System"); Serial.println(" Pump speed adjusts based on soil moisture"); } int getSoilMoisturePercent() { int raw = analogRead(SOIL_SENSOR_PIN); int moisture = map(raw, SOIL_DRY, SOIL_WET, 0, 100); moisture = constrain(moisture, 0, 100); return moisture; } int calculatePumpSpeed(int moisturePercent) { // Calculate pump speed (0-255) based on how dry the soil is // Drier soil → higher pump speed if (moisturePercent >= SOIL_TARGET) { return 0; // Soil moist enough, pump off } // Map moisture deficit (0-100) to pump speed (0-255) int deficit = SOIL_TARGET - moisturePercent; int speed = map(deficit, 0, 100, 0, 255); speed = constrain(speed, 0, 255); return speed; } void loop() { int moisture = getSoilMoisturePercent(); int pumpSpeed = calculatePumpSpeed(moisture); ledcWrite(PUMP_PWM_CHANNEL, pumpSpeed); // Display status Serial.print("💧 Soil moisture: "); Serial.print(moisture); Serial.print("% | Pump speed: "); if (pumpSpeed == 0) { Serial.println("OFF"); } else if (pumpSpeed < 85) { Serial.println("LOW (seedlings mode)"); } else if (pumpSpeed < 170) { Serial.println("MEDIUM (growth mode)"); } else { Serial.println("HIGH (mature plants)"); } delay(5000); // Check every 5 seconds }
For water pumps and motors, you MUST use a MOSFET (e.g., IRLZ44N) or motor driver. Do NOT connect pumps directly to ESP32 pins! Standard relays will fail with PWM signals.
Wiring for MOSFET:
ESP32 PWM pin → MOSFET Gate
12V+ → Water Pump (+) → Water Pump (-) → MOSFET Drain
GND → MOSFET Source
12V- → GND
🌡️ Agricultural Application 2: Greenhouse Fan Speed Control
Control ventilation fan speed based on temperature:
/* * Greenhouse Fan Speed Control * Fan speed increases as temperature rises */ #include#define DHT_PIN 16 #define DHT_TYPE DHT22 #define FAN_PWM_PIN 4 #define FAN_PWM_CHANNEL 0 DHT dht(DHT_PIN, DHT_TYPE); // Temperature thresholds const float TEMP_IDEAL = 25.0; // Ideal temperature (Celsius) const float TEMP_MAX = 35.0; // Maximum temperature const float TEMP_MIN = 15.0; // Minimum temperature void setup() { Serial.begin(115200); dht.begin(); // Configure PWM for fan ledcSetup(FAN_PWM_CHANNEL, 1000, 8); ledcAttachPin(FAN_PWM_PIN, FAN_PWM_CHANNEL); ledcWrite(FAN_PWM_CHANNEL, 0); } int calculateFanSpeed(float temperature) { if (temperature <= TEMP_IDEAL) { return 0; // Fan off } // Calculate speed based on how far above ideal int speed = map(temperature, TEMP_IDEAL, TEMP_MAX, 0, 255); speed = constrain(speed, 0, 255); return speed; } void loop() { float temp = dht.readTemperature(); if (!isnan(temp)) { int fanSpeed = calculateFanSpeed(temp); ledcWrite(FAN_PWM_CHANNEL, fanSpeed); Serial.print("🌡️ Temperature: "); Serial.print(temp); Serial.print("°C | Fan speed: "); Serial.println(fanSpeed); } delay(5000); }
💡 Agricultural Application 3: Sunrise/Sunset LED Lighting
Simulate natural sunrise for poultry houses or plant growth:
/* * Sunrise/Sunset LED Lighting * Perfect for poultry houses or supplemental plant lighting * * Gradually increases light at sunrise, decreases at sunset */ #include#include #define LED_PIN 4 #define LED_CHANNEL 0 // Sunrise at 6:00 AM (gradual increase over 30 minutes) const int sunriseHour = 6; const int sunriseMinute = 0; const int sunriseDuration = 30; // minutes to reach full brightness // Sunset at 6:00 PM (gradual decrease over 30 minutes) const int sunsetHour = 18; const int sunsetMinute = 0; const int sunsetDuration = 30; void setup() { Serial.begin(115200); ledcSetup(LED_CHANNEL, 5000, 8); ledcAttachPin(LED_PIN, LED_CHANNEL); ledcWrite(LED_CHANNEL, 0); // Connect to NTP server for accurate time configTime(0, 0, "pool.ntp.org"); Serial.println("⏰ Waiting for time sync..."); } int calculateLightBrightness() { struct tm timeinfo; if (!getLocalTime(&timeinfo)) { return 0; } int currentMinutes = timeinfo.tm_hour * 60 + timeinfo.tm_min; int sunriseStart = sunriseHour * 60 + sunriseMinute; int sunriseEnd = sunriseStart + sunriseDuration; int sunsetStart = sunsetHour * 60 + sunsetMinute; int sunsetEnd = sunsetStart + sunsetDuration; // Sunrise period if (currentMinutes >= sunriseStart && currentMinutes <= sunriseEnd) { int progress = map(currentMinutes, sunriseStart, sunriseEnd, 0, 255); return constrain(progress, 0, 255); } // Sunset period if (currentMinutes >= sunsetStart && currentMinutes <= sunsetEnd) { int progress = map(currentMinutes, sunsetStart, sunsetEnd, 255, 0); return constrain(progress, 0, 255); } // Daytime (full brightness) if (currentMinutes > sunriseEnd && currentMinutes < sunsetStart) { return 255; } // Nighttime (off) return 0; } void loop() { int brightness = calculateLightBrightness(); ledcWrite(LED_CHANNEL, brightness); delay(60000); // Update every minute }
A farmer installed PWM-controlled LED grow lights and variable-speed fans:
- 💡 LED dimming: 35% energy savings vs on/off control
- 🌡️ Fan speed: Reduced temperature fluctuations by 40%
- 🍅 Yield: 28% increase in tomato production
- 💰 ROI: System paid for itself in 8 months
"The gradual sunrise simulation improved plant growth significantly!" - Greenhouse Manager, South Africa
📊 PWM Frequency Guide
| Application | Recommended Frequency | Why |
|---|---|---|
| LED Lighting | 500-5000 Hz | High frequency prevents flickering |
| DC Motors/Pumps | 100-1000 Hz | Lower frequency reduces motor whine |
| Fans | 25-100 Hz | Very low frequency for smooth operation |
📖 MicroPython PWM (for Raspberry Pi Pico W)
# MicroPython PWM Example
# Works on Raspberry Pi Pico W, ESP32, ESP8266

from machine import Pin, PWM
import time

# PWM on GPIO0 (pin 1)
led = PWM(Pin(0))
led.freq(5000)  # 5kHz frequency

# PWM duty cycle range: 0-65535 (16-bit)
# 0 = 0%, 65535 = 100%

def map_range(x, in_min, in_max, out_min, out_max):
    return int((x - in_min) * (out_max - out_min) / (in_max - in_min) + out_min)

def fade_led():
    print("🎛️ LED fading...")

    while True:
        # Fade up
        for duty in range(0, 65535, 1000):
            led.duty_u16(duty)
            percent = map_range(duty, 0, 65535, 0, 100)
            print(f"Brightness: {percent}%")
            time.sleep(0.01)

        time.sleep(1)

        # Fade down
        for duty in range(65535, 0, -1000):
            led.duty_u16(duty)
            percent = map_range(duty, 0, 65535, 0, 100)
            print(f"Brightness: {percent}%")
            time.sleep(0.01)

        time.sleep(1)

# Variable speed fan example
def variable_speed_fan():
    fan = PWM(Pin(1))
    fan.freq(100)  # 100Hz for motor

    print("💨 Fan speed control...")
    print("1 = 25%, 2 = 50%, 3 = 75%, 4 = 100%, 0 = OFF")

    while True:
        cmd = input("Enter speed: ")

        if cmd == '0':
            fan.duty_u16(0)
            print("Fan OFF")
        elif cmd == '1':
            fan.duty_u16(16383)  # 25%
            print("Fan speed: 25%")
        elif cmd == '2':
            fan.duty_u16(32767)  # 50%
            print("Fan speed: 50%")
        elif cmd == '3':
            fan.duty_u16(49151)  # 75%
            print("Fan speed: 75%")
        elif cmd == '4':
            fan.duty_u16(65535)  # 100%
            print("Fan speed: 100%")

# Uncomment to run:
# fade_led()
# variable_speed_fan()
You've mastered PWM for agricultural control!
✅ Understanding PWM and duty cycles
✅ LED dimming for lighting control
✅ Variable speed pump based on soil moisture
✅ Temperature-based fan control
✅ Sunrise/sunset lighting simulation
Your farm automation can now have smooth, precise control!
ledcSetup(channel, freq, resolution);   // Configure PWM channel
ledcAttachPin(pin, channel);            // Attach pin to channel
ledcWrite(channel, duty);               // Set duty cycle (0-2^resolution -1)

// Resolution examples:
// 8-bit: 0 to 255
// 10-bit: 0 to 1023
// 16-bit: 0 to 65535
- Apply these concepts directly to your farm or project.
- Take notes on important details for the quiz.
- Use the button below to track your progress.