← Back to Course
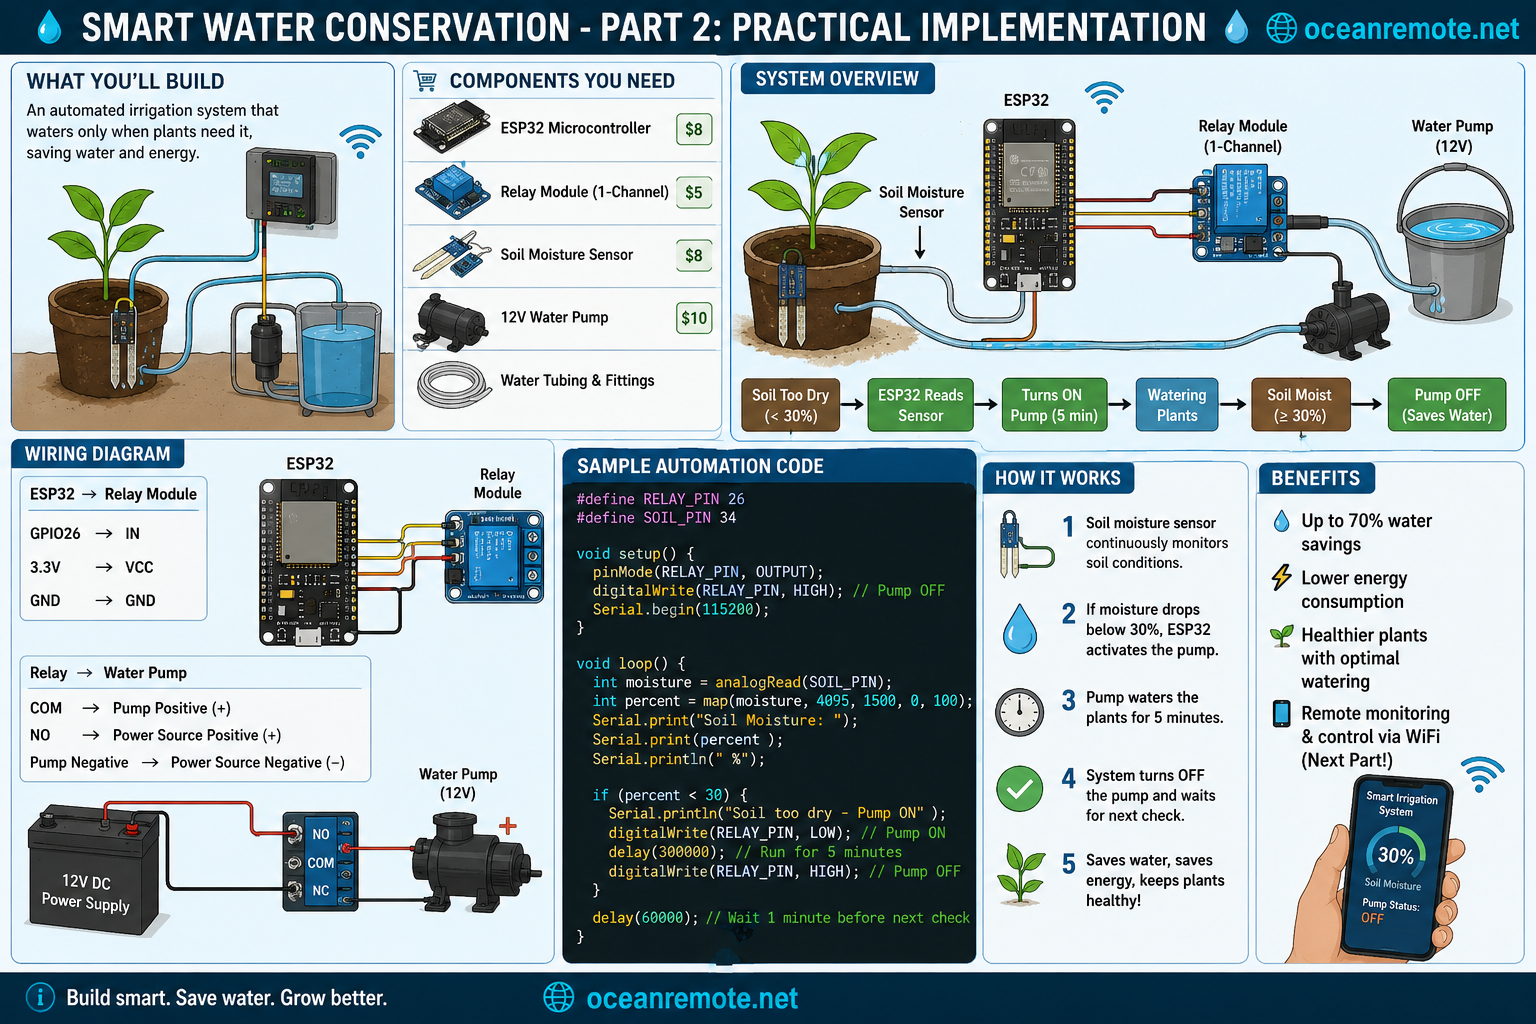
Smart Water Conservation - Part 2
💧 Smart Water Conservation - Part 2: Practical Implementation
💧 What You'll Learn:
- 🛠️ Build a complete automated irrigation system
- 🔌 Wire ESP32, relay module, soil moisture sensor, and water pump
- 💻 Write code to water automatically when soil is dry
- 💰 Save 30-40% water with proper implementation
🛠️ Components You Need
- ESP32 microcontroller ($8): The brain of your irrigation system
- Relay module (1-channel) ($5): Controls the water pump safely
- Soil moisture sensor (capacitive) ($8-12): Measures water content
- 12V water pump ($10-15): Pushes water through drip lines
- 12V power supply ($5-10): Powers the pump
- Water tubing and fittings: Connects pump to irrigation lines
💡 Budget Option:
If you already have a water tank at height, you can use a solenoid valve ($10) instead of a pump (gravity feed). The wiring is identical.
🔌 Complete Wiring Diagram
═══════════════════════════════════════════════════════════════════════════════
                    COMPLETE IRRIGATION SYSTEM WIRING
═══════════════════════════════════════════════════════════════════════════════

    ESP32              Relay Module                 12V Pump
    ════               ═══════════                 ════════
    3.3V    ─────►     VCC
    GND     ─────►     GND
    GPIO26  ─────►     IN

                        Relay COM    ─────►      Pump (+)
                        Relay NO     ─────►      12V Power (+)
                        Pump (-)     ─────►      12V Power (-)

    Soil Moisture Sensor:
    VCC        ─────►  3.3V (ESP32)
    GND        ─────►  GND
    AO         ─────►  GPIO34

═══════════════════════════════════════════════════════════════════════════════
    ⚠️ Most relays are ACTIVE LOW: LOW = pump ON, HIGH = pump OFF
═══════════════════════════════════════════════════════════════════════════════
📖 Complete Automation Code
#define RELAY_PIN 26      // Controls water pump
#define SOIL_PIN 34       // Soil moisture sensor

// Calibration values (CALIBRATE THESE!)
const int DRY_VALUE = 3800;   // Value in dry air
const int WET_VALUE = 1500;   // Value in water

// Irrigation settings
const int WATER_THRESHOLD = 30;   // Water when below 30%
const int WATER_DURATION = 300;   // 5 minutes (in seconds)

void setup() {
    Serial.begin(115200);
    pinMode(RELAY_PIN, OUTPUT);
    digitalWrite(RELAY_PIN, HIGH);  // Pump OFF initially
    Serial.println("💧 Smart Irrigation System Started");
}

void loop() {
    // Read soil moisture
    int raw = analogRead(SOIL_PIN);
    int moisture = map(raw, DRY_VALUE, WET_VALUE, 0, 100);
    moisture = constrain(moisture, 0, 100);

    Serial.print("Soil moisture: ");
    Serial.print(moisture);
    Serial.println("%");

    // Make decision
    if (moisture < WATER_THRESHOLD) {
        Serial.println("⚠️ Soil dry - Starting irrigation!");
        digitalWrite(RELAY_PIN, LOW);     // Pump ON
        Serial.printf("💧 Watering for %d seconds...\n", WATER_DURATION);
        delay(WATER_DURATION * 1000);
        digitalWrite(RELAY_PIN, HIGH);    // Pump OFF
        Serial.println("✅ Irrigation complete");

        // Wait before checking again
        delay(3600000);  // 1 hour
    } else {
        Serial.println("✅ Soil moisture adequate - No watering needed");
        delay(600000);  // Check every 10 minutes
    }
}
⚠️ Important Safety Notes:
- ❌ Never connect pump directly to ESP32 - use relay module!
- 🔌 Use separate 12V power supply for pump (not ESP32 5V)
- 💧 Add a flyback diode (1N4007) across pump terminals to protect relay
- 💡 Test your relay: If pump turns ON with LOW signal, it's active LOW
📖 Real Results - Kenyan Vegetable Farm:
A small farm implemented this exact system on 0.5 hectares:
- 💧 Water savings: 38% reduction (from 8,000 to 5,000 liters/day)
- 📈 Yield increase: 28% higher tomato production
- 💰 Payback period: 3 months from water savings alone
📝 Practice Activity:
Based on what you learned:
- What moisture threshold will you set for your crops?
- How long should your pump run when soil is dry?
- What safety features will you add?
🎯 Key Takeaways:
- ✅ Always use a relay module to control pumps (never direct connection)
- ✅ Calibrate your soil moisture sensor for accurate readings
- ✅ Set threshold at 30-40% for most vegetables
- ✅ Water for 5-10 minutes depending on soil type and crop
- ✅ Check soil moisture after watering to verify system works
💡 Key Takeaways:
- Apply these concepts directly to your farm or project.
- Take notes on important details for the quiz.
- Use the button below to track your progress.
×
![Enlarged view]()