← Back to Course
Automation with Relays - Part 1
⚡ Automation with Relays - Part 1: Understanding the Basics
⚡ What You'll Learn:
- 🔌 Understand what a relay is and why you need one
- 💧 Learn how relays control water pumps and solenoid valves
- 🔗 Connect relays to ESP32 for automated irrigation
- ⚡ Master active LOW vs active HIGH relay logic
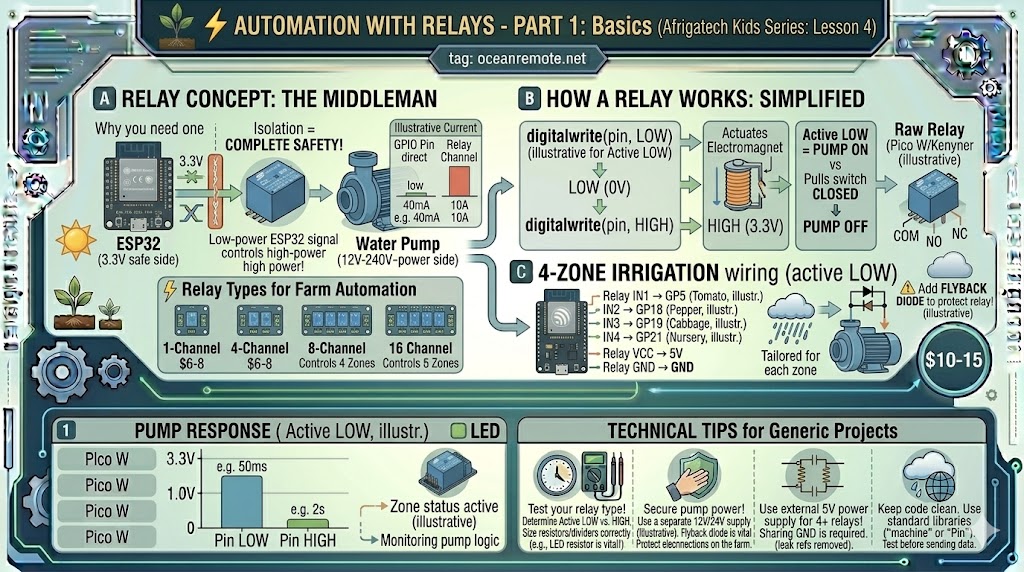
A relay is an electrical switch that allows a low-power signal from an ESP32 to control high-power devices like water pumps (12V-240V). Think of it as a remote-controlled light switch - your ESP32 sends a small signal, and the relay turns the pump on or off.
💡 Why You Cannot Connect Pumps Directly to ESP32:
ESP32 pins output only 3.3V at 40mA max. A water pump needs 12V-240V at 1-10A. Connecting directly would destroy your ESP32! A relay acts as a middleman - ESP32 controls the relay (safe), and the relay controls the pump (safe).
🔧 How a Relay Works
- Low-voltage side: Connects to ESP32 (3.3V signal)
- High-voltage side: Connects to pump (12V-240V)
- Electromagnet: When ESP32 sends signal, magnet pulls switch closed
- Isolation: No electrical connection between ESP32 and pump - complete safety!
📊 Relay Types for Farm Automation
- 1-Channel Relay ($2-3): Controls 1 pump or valve - good for single zone
- 4-Channel Relay ($6-8): Controls 4 zones - ideal for small farms
- 8-Channel Relay ($12-15): Controls 8 zones - for larger operations
- 16-Channel Relay ($25-30): Controls 16 zones - commercial farms
⚠️ Active LOW vs Active HIGH - Critical to Know!
- Active LOW relay (most common):
digitalWrite(pin, LOW)= Relay ON (pump runs) - Active HIGH relay:
digitalWrite(pin, HIGH)= Relay ON (pump runs) - Always test your relay to know which type you have!
🔌 Basic Wiring (4-Channel Relay to ESP32)
- Relay VCC → ESP32 5V (or external 5V supply for 8+ channels)
- Relay GND → ESP32 GND
- Relay IN1 → ESP32 GPIO5 (Zone 1 control)
- Relay IN2 → ESP32 GPIO18 (Zone 2 control)
- Relay IN3 → ESP32 GPIO19 (Zone 3 control)
- Relay IN4 → ESP32 GPIO21 (Zone 4 control)
💧 Pump Wiring to Relay
- Relay COM → Power supply + (12V or 24V)
- Relay NO → Pump positive (+)
- Pump negative (-) → Power supply GND
- ⚠️ Add a flyback diode (1N4007) across pump terminals to protect relay
📖 Success Story - 4-Zone Irrigation in Tanzania:
A vegetable farm installed a 4-channel relay system to automate irrigation across 4 zones:
- 🔌 Zone 1: Tomatoes (GPIO5)
- 🔌 Zone 2: Peppers (GPIO18)
- 🔌 Zone 3: Cabbage (GPIO19)
- 🔌 Zone 4: Nursery (GPIO21)
- 💧 Result: 45% less water, 30% higher yields, 10 hours/week saved
📝 Basic Arduino Code for Relay Control
#define RELAY_PIN 5

void setup() {
    pinMode(RELAY_PIN, OUTPUT);
    digitalWrite(RELAY_PIN, HIGH);  // Start with pump OFF
    Serial.begin(115200);
}

void waterPump(int seconds) {
    digitalWrite(RELAY_PIN, LOW);   // Turn pump ON (active LOW)
    Serial.printf("💧 Pump ON for %d seconds\n", seconds);
    delay(seconds * 1000);
    digitalWrite(RELAY_PIN, HIGH);  // Turn pump OFF
    Serial.println("💧 Pump OFF");
}

void loop() {
    int soilMoisture = 25;  // Replace with actual sensor reading

    if (soilMoisture < 30) {
        waterPump(10);
    }
    delay(60000);
}
💡 Power Supply Guide:
- 1-2 relays: Can power from ESP32 5V pin (500mA)
- 4+ relays: Use external 5V/2A power supply
- Pump power: Separate 12V/24V supply (never from ESP32!)
- Always share GND between ESP32 and external supplies
🎯 Key Takeaways:
- ✅ Relays let ESP32 control high-power pumps safely
- ✅ Most relays are ACTIVE LOW (LOW = ON, HIGH = OFF)
- ✅ 4-channel relay ($6-8) is perfect for small farms
- ✅ Always add a flyback diode to protect the relay
- ✅ Use external power supply for 4+ relays
Next lesson: Automation with Relays - Part 2: Complete Irrigation Code
💡 Key Takeaways:
- Apply these concepts directly to your farm or project.
- Take notes on important details for the quiz.
- Use the button below to track your progress.
×
![Enlarged view]()