← Back to Course
Practical Soil Moisture Sensors
🔌 Connecting a Soil Moisture Sensor
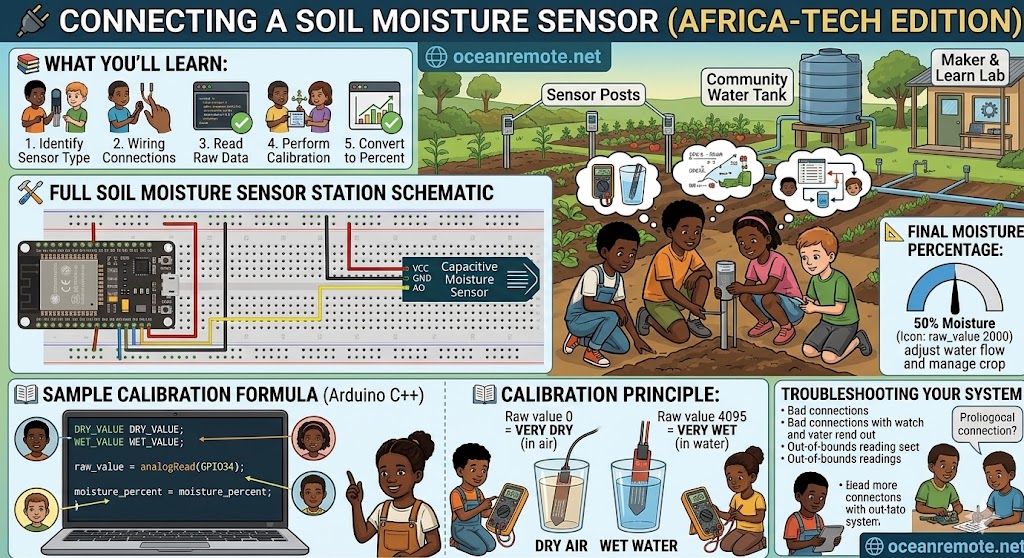
💧 What You'll Learn:
- 🔌 Wire a soil moisture sensor to ESP32/ESP8266
- 📊 Read raw analog values (0-4095 on ESP32, 0-1023 on ESP8266)
- 📐 Convert raw readings to moisture percentage (0-100%)
- 🌱 Calibrate sensor for your specific soil type
⚠️ Capacitive vs Resistive Sensors:
Capacitive sensors (recommended): Last 3-5 years, no corrosion, $8-10
Resistive sensors (avoid): Corrode in 2-4 weeks, $2-3 — false economy!
Always buy capacitive soil moisture sensors for long-term farm use.
🛠️ What You Need
-
🔹 Capacitive Soil Moisture Sensor
$8-10 · Recommended (lasts 3-5 years, no corrosion) -
🔹 Resistive Sensor (not recommended)
$2-3 · Avoid (corrodes in 2-4 weeks) -
🔹 ESP32 or ESP8266 board
$8-12 · Any ADC pin works -
🔹 3 jumper wires (female-to-female)
$2 · For connections
🔗 Wiring Connection
Soil Moisture Sensor → ESP32/ESP8266
═══════════════════════════════════════════════════════════════
VCC (Red wire)   → 3.3V or 5V pin
GND (Black wire) → GND pin
AO (Analog Out)  → ADC pin (GPIO34 on ESP32, A0 on ESP8266)

ESP32 Analog Pins: GPIO32, GPIO33, GPIO34, GPIO35, GPIO36, GPIO39
ESP8266 Analog: Only A0 pin!
💡 ESP32 vs ESP8266 ADC Notes:
- ESP32: 12-bit ADC → values 0 to 4095 (more precise)
- ESP8266: 10-bit ADC → values 0 to 1023 (only A0 pin)
- ESP32 advantage: Better resolution and multiple ADC pins
📖 Reading the Raw Value
#include <WiFi.h>

#define SOIL_SENSOR_PIN 34

void setup() {
    Serial.begin(115200);
    pinMode(SOIL_SENSOR_PIN, INPUT);
    Serial.println("🌱 Soil Moisture Sensor Ready");
    Serial.println("=================================");
}

void loop() {
    int rawValue = analogRead(SOIL_SENSOR_PIN);

    Serial.printf("📊 Raw sensor value: %d\n", rawValue);

    // ESP32: 0-4095 range
    if (rawValue < 500) {
        Serial.println("💧 VERY WET - Soil is saturated");
    } else if (rawValue < 1500) {
        Serial.println("🌊 WET - Good moisture level");
    } else if (rawValue < 2500) {
        Serial.println("🌿 MOIST - Getting dry");
    } else if (rawValue < 3500) {
        Serial.println("⚠️ DRY - Water soon!");
    } else {
        Serial.println("🔥 VERY DRY - Water immediately!");
    }

    delay(5000);  // Read every 5 seconds
}
📊 Understanding Raw Values (ESP32):
- Raw value 4095 = Very dry (sensor in air) — HIGHEST reading
- Raw value 3000-3500 = Dry soil — needs water soon
- Raw value 2000-2500 = Moderate moisture — good for most crops
- Raw value 1000-1500 = Wet soil — ideal after watering
- Raw value 0-500 = Very wet (sensor in water) — LOWEST reading
⚠️ Note: Higher value = DRYER soil. Lower value = WETTER soil. This is opposite of what most people expect!
📐 Calibration Formula (Convert to Percentage)
// Complete calibration code
#define SOIL_SENSOR_PIN 34

int dryValue = 4095;   // Measure in DRY air (sensor not in soil)
int wetValue = 1500;   // Measure in WET soil (after watering)

int getMoisturePercent() {
    int raw = analogRead(SOIL_SENSOR_PIN);

    // Formula: Convert raw to percentage
    // Higher raw = drier, so we invert the formula
    int percent = map(raw, dryValue, wetValue, 0, 100);
    percent = constrain(percent, 0, 100);

    return percent;
}

void setup() {
    Serial.begin(115200);
    Serial.println("🌱 Calibrated Soil Moisture Sensor");
    Serial.println("=================================");
}

void loop() {
    int moisture = getMoisturePercent();

    Serial.printf("💧 Soil Moisture: %d%%\n", moisture);

    if (moisture < 30) {
        Serial.println("⚠️ CRITICAL - Water immediately!");
    } else if (moisture < 50) {
        Serial.println("🌿 Dry - Plan to water soon");
    } else if (moisture < 70) {
        Serial.println("✅ Good moisture level");
    } else {
        Serial.println("🌊 Very wet - Reduce watering");
    }

    delay(60000);  // Read every minute
}
📐 How to Calibrate Your Sensor:
- Step 1 - Find DRY value: Hold sensor in AIR (not touching anything) → record reading (~4095)
- Step 2 - Find WET value: Submerge sensor in a glass of WATER → record reading (~1500)
- Step 3 - Update code: Replace dryValue and wetValue with YOUR readings
- Step 4 - Test in soil: Take a reading in moist soil → should be ~50-70%
⚠️ Important Notes:
- The sensor measures electrical conductivity, not actual water content
- Different soil types (sandy vs clay) give different readings — calibrate for YOUR soil!
- Salt/fertilizer in soil affects readings — calibrate after fertilizing
- Resistive sensors corrode — buy capacitive sensors for long-term use
- Insert sensor at 5-10cm depth (active root zone)
📖 Case Study — Capacitive Sensor Lasts 3+ Years, Kenya:
A farmer initially bought cheap resistive sensors ($3 each):
- ❌ Result: Sensors failed after 3 weeks (corrosion)
- 💰 Cost: Bought 4 replacements in 3 months ($12 total)
- ✅ Switched to capacitive ($10): Still working after 3 years!
- 💧 Water savings: 45% reduction with reliable data
- 📈 ROI: $10 sensor paid for itself in 2 months
"I learned the hard way. Cheap resistive sensors cost more in the long run. Buy capacitive once and forget about it." — Farmer, Nakuru County
🌟 Quick Reference — Sensor Values to Percentage:
- Formula:
moisture% = map(raw, dryValue, wetValue, 0, 100) - ESP32 example: Raw 4095 (dry air) → 0%, Raw 1500 (wet) → 100%
- ESP8266 example: Raw 1023 (dry air) → 0%, Raw 400 (wet) → 100%
- Adjust thresholds: Sandy soil needs lower thresholds (drains faster)
🎯 Key Takeaways:
- ✅ Always buy capacitive sensors — they last 3-5 years, resistive corrodes in weeks
- ✅ ESP32 gives 0-4095 range (12-bit), ESP8266 gives 0-1023 (10-bit) on A0 only
- ✅ Higher raw value = DRIER soil. Lower raw value = WETTER soil (opposite of intuition!)
- ✅ Calibrate for YOUR soil: measure dry air and wet water, then use map() formula
- ✅ Different soil types (sandy/clay) need different moisture thresholds
- ✅ Insert sensor at 5-10cm depth (active root zone) for accurate readings
- ✅ A $10 capacitive sensor pays for itself in 1-2 months through water savings
💡 Key Takeaways:
- Apply these concepts directly to your farm or project.
- Take notes on important details for the quiz.
- Use the button below to track your progress.
×
![Enlarged view]()