- ✓ Navigating your OceanRemote dashboard
- ✓ Understanding device cards and status indicators
- ✓ Controlling relays and monitoring sensors
- ✓ Managing device settings and security
- ✓ Using the debug console for advanced monitoring
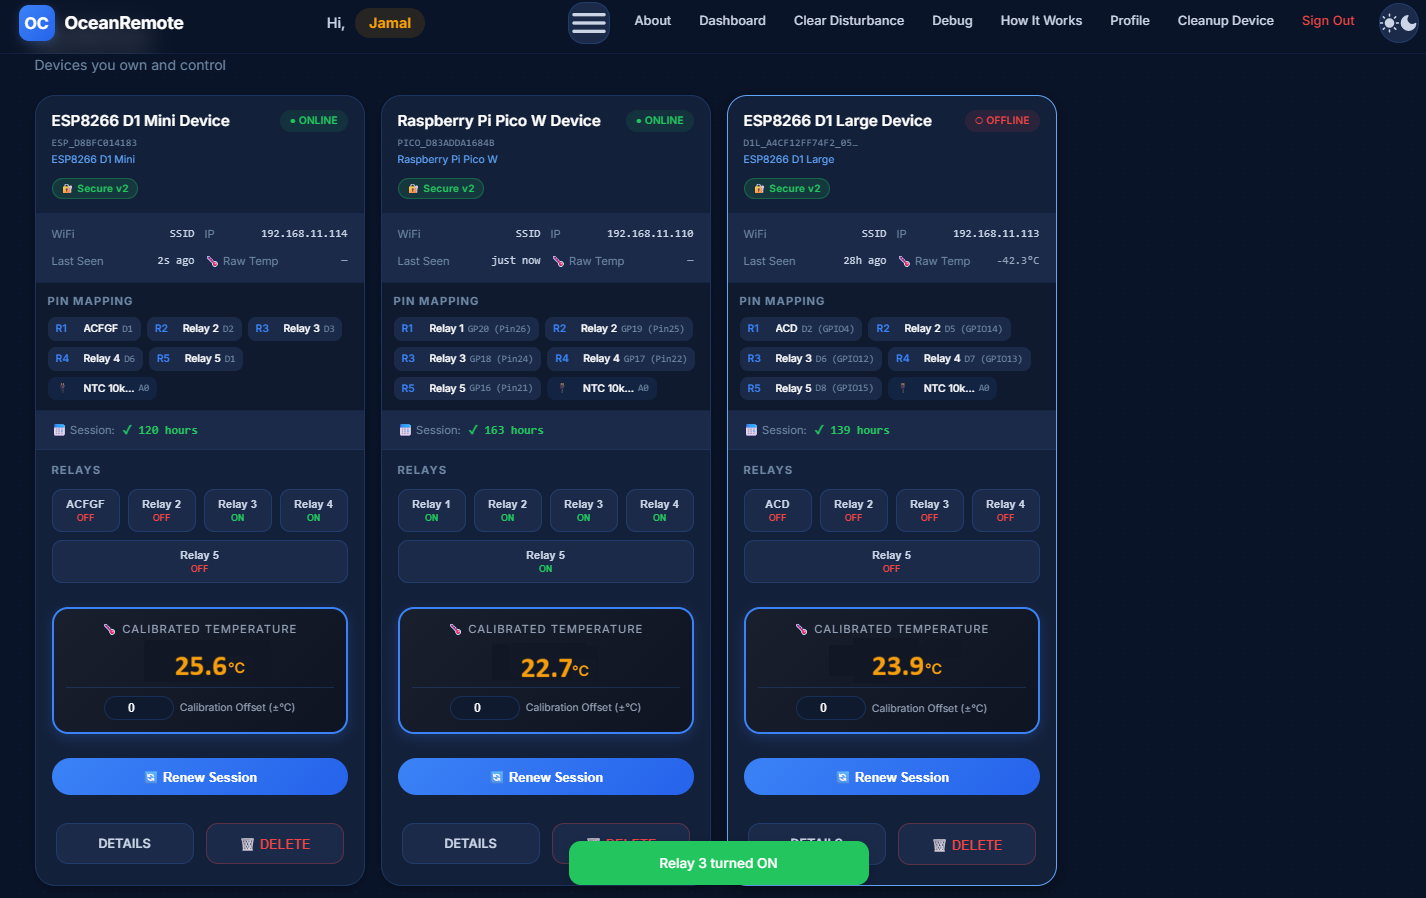
Dashboard Overview
After logging into OceanRemote, you'll see your main dashboard. This is your command center for all connected devices. The dashboard is designed to give you at-a-glance information about every device you own.
Top Navigation Bar
- Dashboard - Your main device overview (you are here)
- Clear Disturbance - Self-service tool to unblock your IP if you've been temporarily banned (explained in security tutorials)
- Debug - Advanced monitoring console for technical users
- How It Works - Tutorials and documentation
- Profile - Manage your account settings
- Analytics - (Admin only) Platform usage statistics
- Admin - (Admin only) Django administration panel
- Sign Out - End your session
Statistics Cards
At the top of your dashboard, you'll see four statistics cards:
- MY DEVICES - Total number of devices registered to your account
- ONLINE - Devices currently connected and responding
- RELAYS ACTIVE - Total number of relays currently turned ON across all devices
- TEMP ACTIVE - Number of devices reporting temperature data
Device Cards
Each device appears as a card containing all controls and information. Here's what each section means:
Device Header
- Device Name - Customizable name you gave your device
- Device ID - Unique identifier (e.g., ESP_AABBCCDDEEFF)
- Board Type - ESP8266 D1 Mini, ESP32, Pico W, etc.
- Security Badge - 🔐 Secure v2 (modern) or ⚠️ Legacy (needs upgrade)
- Status Indicator - ● ONLINE (green), ◑ AWAY (yellow), ○ OFFLINE (red)
- 🔐 Secure v2 - Your device uses modern token-based authentication with MAC binding. This is the recommended standard.
- ⚠️ Legacy Token / Legacy v1 - Your device uses older firmware. Click "Upgrade to Secure v2" to improve security.
Device Details
- WiFi - The SSID your device is connected to
- IP - Local IP address of your device on your network
- Last Seen - When your device last communicated with the server
- Raw Temp - Uncalibrated temperature reading (if sensor connected)
Pin Mapping
This horizontal bar shows how your relays are mapped to physical pins:
- R1, R2, R3, R4, R5 - Relay numbers
- Custom Names - Names you assigned (e.g., "AC", "FAN")
- GPIO Pins - The physical pins used (e.g., 16, 17, 18 for Pico W)
- 🔌 Sensor Pin - Shows which pin your sensor is connected to (if any)
- ESP8266 D1 Mini: Relays on D1-D5 (GPIO5, GPIO4, GPIO0, GPIO2, GPIO14)
- ESP32: Relays on GPIO2, GPIO4, GPIO5, GPIO12, GPIO13
- Raspberry Pi Pico W: Relays on pins 16, 17, 18, 19, 20
- Raspberry Pi 4/Zero 2W: Relays on GPIO17, GPIO27, GPIO22, GPIO23, GPIO24
Session Info
Shows your device's active session status:
- ✓ X hours - Time remaining before session expires (refreshes automatically)
- No session - Device needs to reconnect
Relay Controls
Five buttons that let you control each relay individually:
- ON (Green) - Relay is activated (circuit closed)
- OFF (Red) - Relay is deactivated (circuit open)
- Click to toggle - Instantly changes the relay state
- Custom Names - Buttons show the names you assigned (e.g., "AC", "FAN")
Positive Logic (🔺) - HIGH signal = ON, LOW signal = OFF
Negative Logic (🔻) - LOW signal = ON, HIGH signal = OFF
Choose the logic that matches your relay module. Most cheap relay modules use Negative Logic.
Calibrated Temperature Card
If your device has a temperature sensor, you'll see a dedicated temperature card:
- Calibrated Temperature - Temperature reading with your offset applied
- Calibration Offset (±°C) - Input field to adjust readings
- How it works: Calibrated = Raw Reading + Offset
- Example: If your sensor reads 22.5°C but actual is 23.0°C, set offset to +0.5
Temperature sensors (especially NTC thermistors) can have slight inaccuracies. Calibration lets you correct these without changing your firmware.
Device Actions
- DETAILS - Opens detailed device configuration page (token management, security settings)
- DELETE - Removes device from your account (cannot be undone)
Pending Devices Section
If you've generated firmware but haven't flashed it yet, devices appear here as "Pending". From this section you can:
- CLAIM THIS DEVICE - Manually register a device that has already connected
- DELETE - Remove pending configuration (firmware code will no longer work)
Pending devices expire after 24 hours. If you don't claim them within this time, you'll need to generate new firmware.
Debug Console (Advanced Users)
The Debug page (accessible from the top navigation) provides real-time monitoring of your devices:
- Live device status updates every 3 seconds
- Detailed relay states and sensor readings
- Session expiry information
- Last seen timestamps
What Each Status Color Means
- 🟢 ONLINE (Green) - Device has communicated within the last 10 seconds. Your device is active and ready to receive commands.
- 🟡 AWAY (Yellow) - Device hasn't communicated for 10-300 seconds. May be on standby or experiencing brief network issues.
- 🔴 OFFLINE (Red) - Device hasn't communicated for over 5 minutes. Check power, WiFi connection, or re-flash firmware.
Next Steps
Now that you understand the dashboard, you're ready to:
- Tutorial 04: Install Arduino IDE to prepare for flashing
- Tutorial 05-09: Set up board support for your specific hardware
- Tutorial 10-15: Wire your relays and sensors correctly
The OceanRemote dashboard gives you complete control over your IoT devices. From here, you can monitor status, control relays, calibrate sensors, and manage security settings - all from one interface.