Soil Temperature Sensors - DS18B20 and NTC
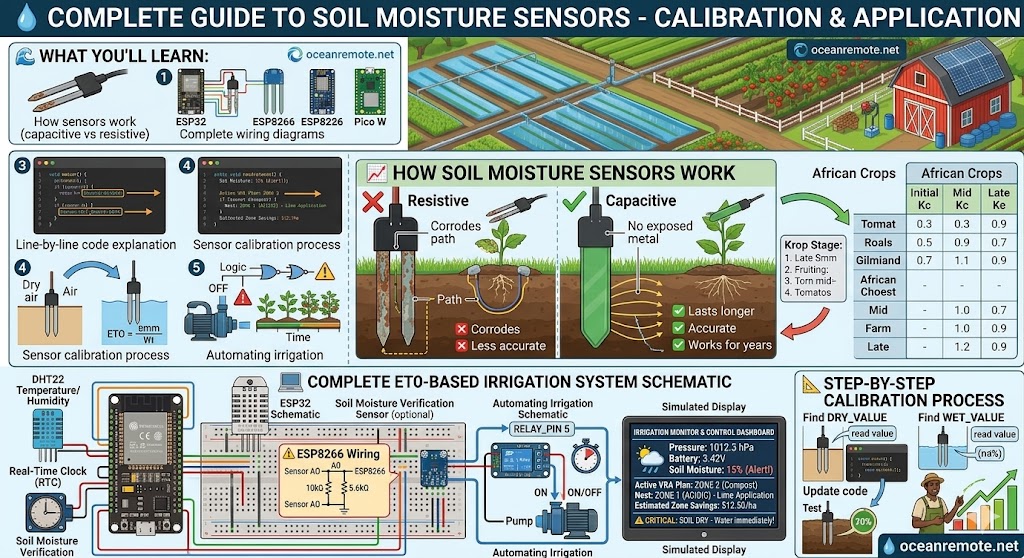
💧 Complete Guide to Soil Moisture Sensors
🌱 What You'll Learn in This Lesson:
- How soil moisture sensors work (capacitive vs resistive)
- Complete wiring diagrams for ESP32, ESP8266, and Pico W
- Step-by-step code explanation with line-by-line breakdown
- How to calibrate your sensor for accurate readings
- Practical application: automating irrigation based on soil moisture
📊 How Soil Moisture Sensors Work
Soil moisture sensors measure the water content in soil. There are two main types:
| Type | How It Works | Pros & Cons |
|---|---|---|
| Resistive | Measures electrical resistance between two probes. Water conducts electricity, so wet soil = lower resistance. | ✅ Cheap ($2-3) ❌ Corrodes over time ❌ Less accurate |
| Capacitive | Measures dielectric constant of soil. Water has a higher dielectric constant than dry soil. | ✅ Lasts longer (no exposed metal) ✅ More accurate ✅ Works for years ❌ Slightly more expensive ($8-12) |
For long-term agricultural projects, always choose capacitive sensors. They cost a bit more but will last for years without corroding. Resistive sensors may fail within months in constantly moist soil.
🔧 Sensor Comparison by Crop
| Application | Recommended Sensor | Why |
|---|---|---|
| Greenhouse (short-term projects) | Resistive (under $5) | Controlled environment, less corrosion risk |
| Field crops (long-term) | Capacitive ($8-12) | Lasts for years, accurate readings |
| Budget learning / prototyping | Resistive ($2-3) | Good for learning, cheap to replace |
🔌 Complete Wiring Guide
📡 For ESP32 (Recommended):
Capacitive Soil Moisture Sensor → ESP32
VCC (Red/Brown)              → 3.3V pin
GND (Black)                  → GND pin
AO (Analog Output) (Yellow/Blue) → GPIO32 (or any ADC pin)
📡 For ESP8266 (Budget Option):
ESP8266 ADC only accepts 0-1V! Most sensors output 0-3.3V. You MUST use a voltage divider:
Sensor AO → 10kΩ resistor → ESP8266 A0
Sensor AO → 5.6kΩ resistor → GND
(Output voltage: 3.3V * (5.6 / (10 + 5.6)) = 1.18V)
🍓 For Raspberry Pi Pico W:
Capacitive Soil Moisture Sensor → Pico W
VCC                           → 3.3V (pin 36)
GND                           → GND (pin 38)
AO (Analog Output)            → GP26 (ADC0, pin 31)
📖 Complete Arduino Code with Explanation
/* * Soil Moisture Sensor Monitor for ESP32/ESP8266 * * This code reads a soil moisture sensor and tells you: * - Raw analog value (0-4095 on ESP32) * - Moisture percentage (0-100%) * - When to water (alert when below 30%) * * How to use: * 1. Connect sensor to GPIO32 (ESP32) or A0 (ESP8266 with voltage divider) * 2. Calibrate: Find DRY_VALUE and WET_VALUE (see calibration section) * 3. Upload and open Serial Monitor at 115200 baud * 4. Watch your soil moisture in real-time! */ #include// Not needed after ESP32 core installation // ========== PIN CONFIGURATION ========== #ifdef ESP32 const int SOIL_PIN = 32; // GPIO32 has ADC capability #endif #ifdef ESP8266 const int SOIL_PIN = A0; // A0 is the only ADC pin on ESP8266 #endif // ========== CALIBRATION VALUES - YOU MUST ADJUST THESE! ========== // Step 1: Upload code with DRY_VALUE = 4095, WET_VALUE = 0 // Step 2: Read sensor in dry air → record value // Step 3: Submerge sensor in water → record value // Step 4: Replace these values with YOUR readings const int DRY_VALUE = 3800; // Replace with your dry air reading (ex: 3500-4095) const int WET_VALUE = 1500; // Replace with your water reading (ex: 1000-2000) // ========== THRESHOLDS (Adjust based on your crops) ========== const int WATER_NEEDED = 30; // Water when moisture drops below 30% const int TOO_WET = 80; // Too wet above 80% (risk of root rot) void setup() { Serial.begin(115200); pinMode(SOIL_PIN, INPUT); Serial.println("========================================"); Serial.println("💧 Soil Moisture Monitor v1.0"); Serial.println("========================================"); Serial.print("Sensor Pin: "); Serial.println(SOIL_PIN); Serial.print("Calibration: Dry="); Serial.print(DRY_VALUE); Serial.print(", Wet="); Serial.println(WET_VALUE); Serial.println("======================================== "); } void loop() { // Step 1: Read raw analog value int raw = analogRead(SOIL_PIN); // Step 2: Convert to percentage (map raw to 0-100%) int moisture = map(raw, DRY_VALUE, WET_VALUE, 0, 100); // Step 3: Constrain to valid range (0-100%) moisture = constrain(moisture, 0, 100); // Step 4: Display results Serial.print("📊 Raw: "); Serial.print(raw); Serial.print(" | 💧 Moisture: "); Serial.print(moisture); Serial.println("%"); // Step 5: Make irrigation recommendations if (moisture < WATER_NEEDED) { Serial.println("⚠️ CRITICAL: SOIL IS DRY - Water immediately!"); // To automate: digitalWrite(RELAY_PIN, LOW); // Turn pump ON } else if (moisture > TOO_WET) { Serial.println("✅ Soil is wet - Stop watering, check drainage if persists"); // To automate: digitalWrite(RELAY_PIN, HIGH); // Turn pump OFF } else if (moisture < 45) { Serial.println("🟡 Soil is drying - Prepare to water soon"); } else { Serial.println("✅ Soil moisture is adequate"); } Serial.println("----------------------------------------"); // Wait 60 seconds before next reading (saves battery) delay(60000); }
📊 Code Explanation: Line by Line
analogRead(SOIL_PIN)- Reads voltage from sensor (0-3.3V → 0-4095 on ESP32)map(raw, DRY_VALUE, WET_VALUE, 0, 100)- Converts raw reading to percentage. Example: 3800 (dry) → 0%, 1500 (wet) → 100%constrain(moisture, 0, 100)- Ensures value never goes below 0% or above 100%if (moisture < 30)- Alert when soil is too dry (most crops need water below 30%)if (moisture > 80)- Alert when soil is too wet (risk of root rot)delay(60000)- Wait 1 minute between readings (adjust for your needs)
📖 MicroPython Version for Raspberry Pi Pico W
# Soil Moisture Sensor for Raspberry Pi Pico W
# Uses ADC0 (GP26) which reads 0-3.3V → 0-65535

from machine import Pin, ADC
import time

# Initialize ADC on GP26 (pin 31)
moisture_sensor = ADC(Pin(26))  # GP26 is ADC0

# CALIBRATION VALUES - REPLACE WITH YOUR READINGS!
DRY_VALUE = 60000   # Reading in dry air (ex: 55000-65535)
WET_VALUE = 20000   # Reading in water (ex: 10000-25000)

def read_soil_moisture():
    """Read soil moisture and return percentage"""
    raw = moisture_sensor.read_u16()  # Returns 0-65535
    # Calculate percentage
    percent = 100 - ((raw - WET_VALUE) * 100 / (DRY_VALUE - WET_VALUE))
    # Constrain to 0-100%
    percent = max(0, min(100, percent))
    return raw, percent

print("💧 Soil Moisture Monitor Started")
print("=" * 40)

while True:
    raw, moisture = read_soil_moisture()

    print(f"Raw: {raw:5d} | Moisture: {moisture:.1f}%")

    if moisture < 30:
        print("⚠️  SOIL DRY - Water now!")
    elif moisture > 80:
        print("✅ Soil wet - No watering needed")

    print("-" * 40)
    time.sleep(60)  # Read every minute
📐 Calibration Process (Important!)
Every sensor is different! You MUST calibrate yours for accurate readings:
- Find DRY_VALUE: Place sensor in dry air (not touching soil). Run code and note the reading after 30 seconds. Write it down: DRY_VALUE = _______
- Find WET_VALUE: Submerge sensor completely in a glass of water. Run code and note the reading after 30 seconds. Write it down: WET_VALUE = _______
- Update code: Replace the DRY_VALUE and WET_VALUE constants with YOUR readings.
- Test: Insert sensor into moist soil. The percentage should read between 30-70%.
🌱 Application: Automating Irrigation
Once your sensor is calibrated, use it to control a water pump automatically:
// Add a relay to control a water pump
#define RELAY_PIN 5

void setup() {
    pinMode(RELAY_PIN, OUTPUT);
    digitalWrite(RELAY_PIN, HIGH);  // Pump starts OFF
}

void loop() {
    int moisture = readSoilMoisture();  // Your moisture reading

    if (moisture < 30) {
        digitalWrite(RELAY_PIN, LOW);   // Turn pump ON
        delay(60000);                    // Water for 1 minute
        digitalWrite(RELAY_PIN, HIGH);  // Turn pump OFF
    }
    delay(60000);
}
A tomato farmer installed capacitive soil moisture sensors with ESP32. After calibration, the system automatically watered when moisture dropped below 30%. Results after 3 months:
- 💧 Water usage decreased by 38%
- 📈 Tomato yield increased by 28%
- 💰 Saved $45 per month on water bills
- 🌱 Healthier plants with no over-watering
"The sensors paid for themselves in the first month!" - Farm owner, Kenya
✅ Quick Reference: Soil Moisture Levels by Crop
| Crop | Ideal Moisture % | Water Below % | Too Wet Above % |
|---|---|---|---|
| Tomatoes | 65-80% | 55% | 85% |
| Maize/Corn | 60-75% | 50% | 80% |
| Vegetables (leafy) | 70-85% | 60% | 88% |
| Wheat | 55-70% | 45% | 75% |
| Onions/Garlic | 50-65% | 40% | 70% |
- Forgetting to calibrate: Using default values will give inaccurate readings
- ESP8266 without voltage divider: Will damage your board (max 1V on ADC!)
- Water directly on electronics: Keep the circuit board above water, only submerge the probe
- Reading too frequently: Every minute is fine. Every second will overload your sensor
- Apply these concepts directly to your farm or project.
- Take notes on important details for the quiz.
- Use the button below to track your progress.